
|
|
#1 |
|
Участник
|
powerobjects: Power BI URL Query in Dynamics 365 for Customer Engagement (CE)
Источник: https://www.powerobjects.com/2019/01...-bi-url-query/
==============  In a previous blogpost, we discussed how to drill into Dynamics 365 CE records from Power BI. Well, how about the other way around – drilling from Dynamics 365 CE to Power BI Service? Today, we’ll demonstrate how to display a Power BI report of a Dynamics 365 account in Power BI by clicking a link within a Dynamics 365 account form. Enjoy! We are going to apply “URL Query” to achieve this feature by passing an account number from the Dynamics 365 account form to the URL. The list below summarizes the steps:
Step 1: Create a Power BI Report with Dynamics 365 Data Source We created a Power BI report to display a specific account information of Dynamics 365 for Sales. It includes Account Name, Account Number, All Opportunities associated to the account, Actual Value, Estimated Value, and Closed Date. The report is created in Power BI Desktop. **The image below shows all opportunity data with no account selected 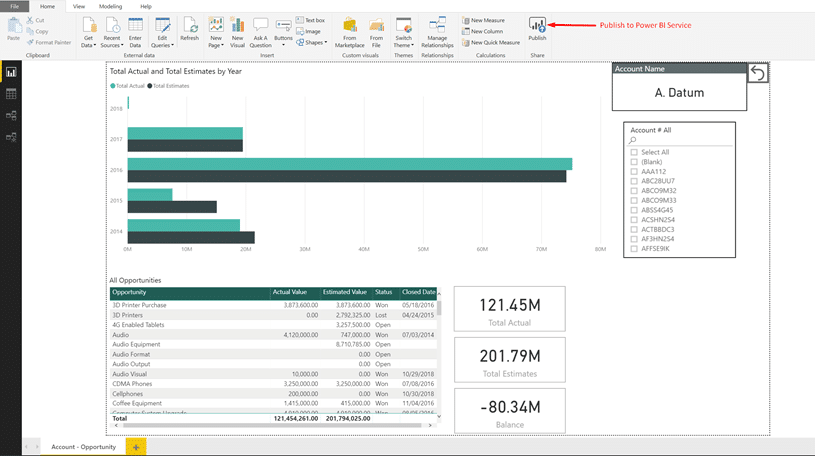 Step 2: Publish the Report to Power BI Service By clicking on the Publish button in the screenshot above, we have published the Power BI report from Power BI Desktop to Power BI Service. Once it is successful and the following message appears, click Open ‘POC URL Query.pbix’ in Power BI to view the report. 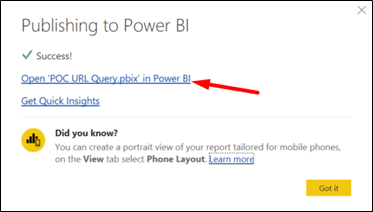 Step 3: Create Two Fields in Dynamics 365 Account Form We are going to use the Account Number field in the Account entity in Dynamics 365. We could achieve the same result by using the Account ID (GUID) field – however, one benefit of using Account Number is that it is a common field between Dynamics 365 CE and the Finance and Operations module. Therefore, we can use the Account Number field to associate between the two applications and create a data model in Power BI. The Account Number field is available in the Account entity, although by default it is not displayed in the Account main form. Therefore, we need to add the field to the form. We will also create a custom field in the account form to store the “URL Query.” Adding Account Number field: 1. Login to Dynamics 365 for Sales and open an account form (for purposes of the demonstration, we are going to use the Proseware, Inc. sample account). 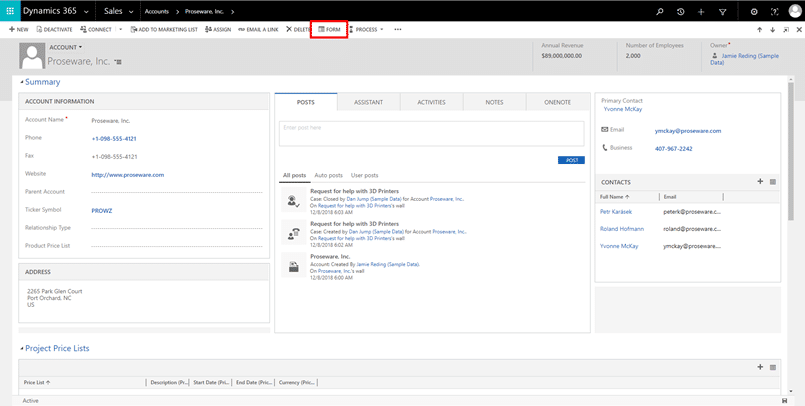 2. Click on FORM as shown above. (Note that if you don’t see FORM as an option, contact your System Admin for permission.) 3. The Account Form Designer appears. Click the Account Number field and drag-and-drop it under the Account Name field (labeled as 1 in the screenshot below).  4. Click Save (2). 5. Click Publish (3). 6. Click Save and Close (4). 7. Refresh your browser to see the Account Number field in the form. 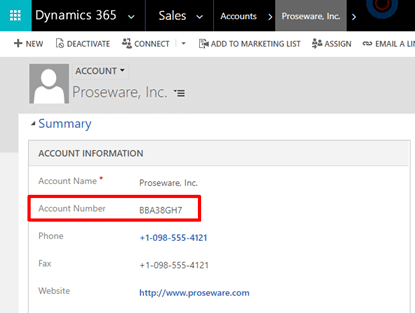 Adding URL Query field: 1. Click FORM > New Field. 2. In the properties window, let’s set the values as:
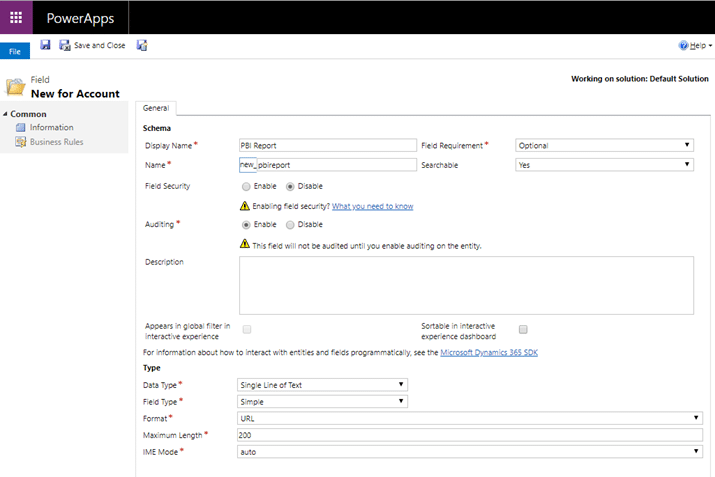 3. Click Save and Close. 4. Refresh the web browser of the Account Form Designer (hit F5 key). 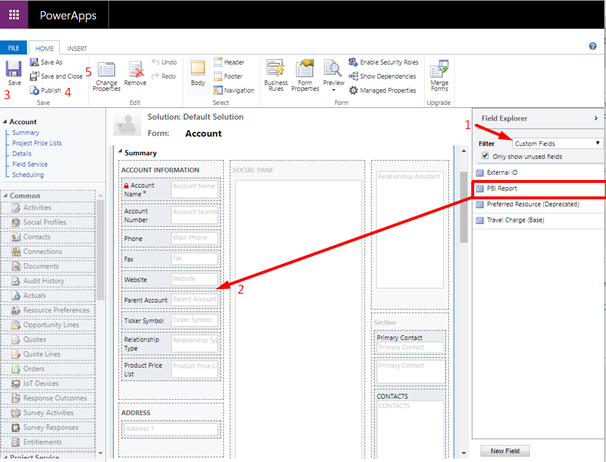 5. Select Custom Fields from the Filter dropdown (labeled 1 in the screenshot above). 6. Drag-and-drop PBI Report under the Website field (2.) 7. Click Save (3). 8. Click Publish (4). 9. Click Save and Close (5). 10. Refresh your browser and see the PBI Report field in the form. 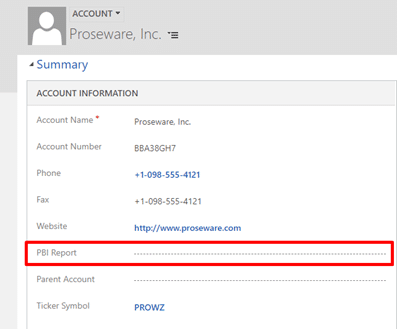 Step 4: Create a URL Query Next, we will extract and create a URL query string from Power BI Service. Let’s open Notepad to save the URL for later use. 1. Go to Power BI Service and open the report page published way back in Steps 1 and 2. 2. If we have more than one page in the report, it is important to select the report page on which we plan to display by default. 3. Copy the URL and paste it into Notepad.  In our case, this is what should be pasted into Notepad: https://app.powerbi.com/groups/me/re...8e442abc0c790a 4. Update the URL in Notepad by adding ?filter=accounts/accountnumber eq ” immediately following URL – with no space! Note that those are two single quotation marks at the end – not one double quotation mark. This is important, as you’ll see in Step 5! It should now look like this: https://app.powerbi.com/groups/me/re...8e442abc0c790a?filter=accounts/accountnumber eq ” Step 5: Create a Workflow in Dynamics 365 to Populate Account Number in URL Query 1. Go to Settings > Processes in Dynamics 365. 2. Click +NEW to create a workflow. 3. In the properties window, let’s set the values as:
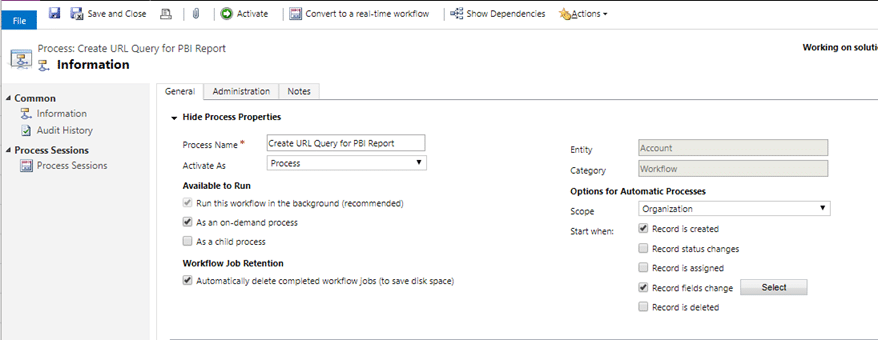 4. For Add Step, click Update Record. 5. Select Account for entity. 6. Click Set Properties. 7. Copy and paste the URL Query (from Step 4) to the PBI Report field (see below). 8. Under Operator > Look for, select Account and Account Number. Click Add, as shown:  9. Before clicking OK, it is important to set the cursor between the single quotation marks of the URL Query and add the Account Number parameter between them. Account Number parameter = {Account Number(Account)}. The URL should now look like this: https://app.powerbi.com/groups/me/reports/32068cc5-719a-46ba-8504-b78a62e8dc4a/ReportSection8b8acc8e442abc0c790a?filter=accounts/accountnumber eq ‘{Account Number(Account)}‘   10. Click Save and Close. 11. Click Activate. 12. Click Save and Close on the workflow window. Step 6: Let’s See a Result! First, we need to run the workflow we created in the previous step and populate the URL Query with account number for an account. Recall that we are using Proseware, Inc. for this demo. 1. In Dynamics 365 for Sales, open the account form of Proseware, Inc. Note that there is no URL Query created in the PBI Report field yet. 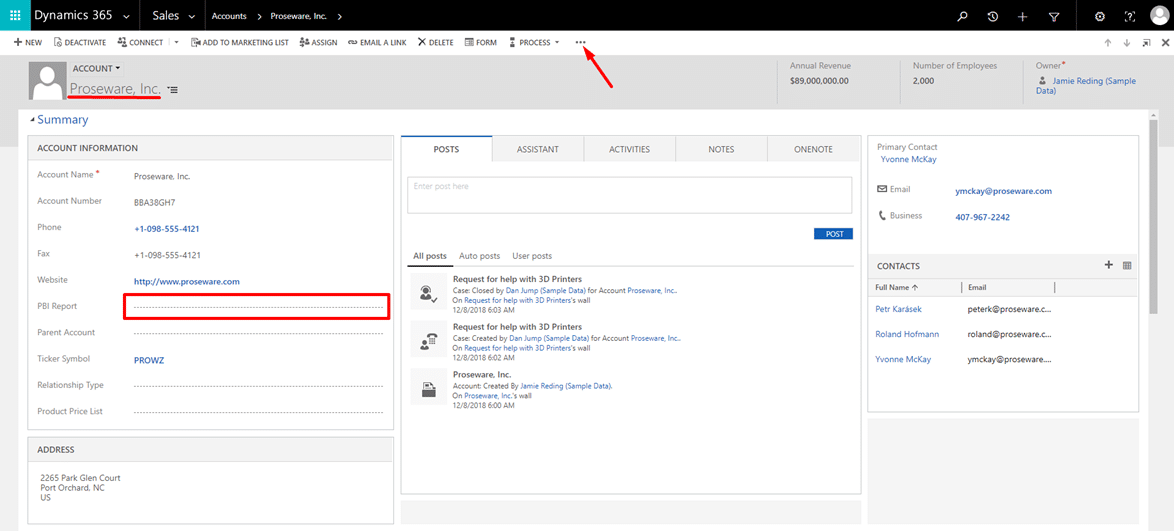 2. Click on the ellipses … next to PROCESS in the Command bar. 3. Click Run Workflow. 4. Select the workflow we created in Step 5 and click Add > OK. 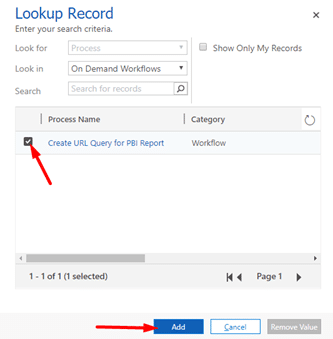 5. Let a few seconds pass and refresh the browser of the Proseware, Inc. account form. 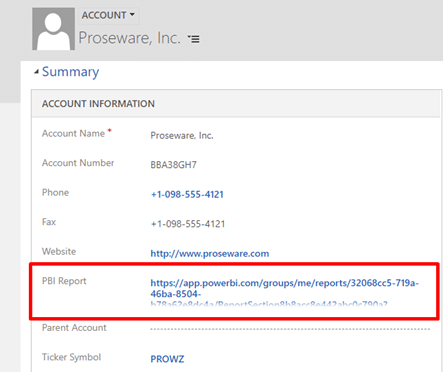 The URL Query link is populated!!! For other accounts, we can also run the same workflow from the All Accounts view by selecting all the accounts at the same time. 6. Let’s click on the link in the PBI Report field. 7. The Power BI Service window appears with the account number filtered for the Proseware, Inc.
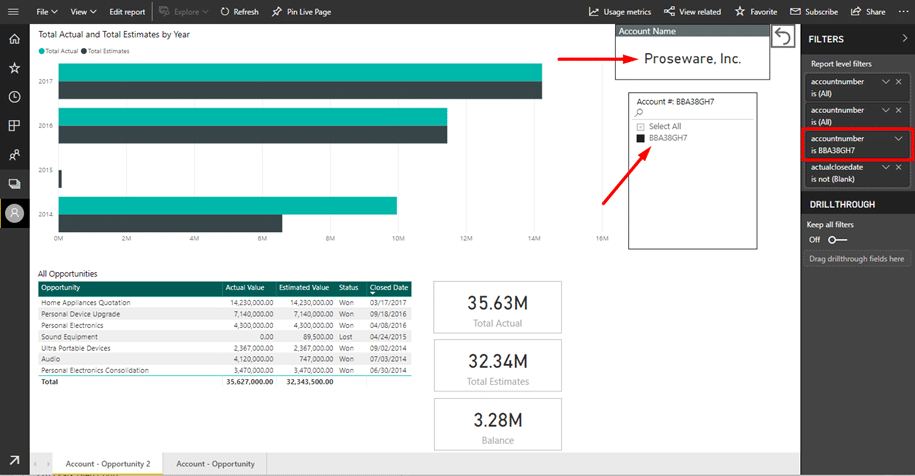 We’re done! This has been just one example of Power BI and Dynamics 365 integration by URL Query with no coding. It’s slick. Happy Power BI’ing & D365’ing! The post Power BI URL Query in Dynamics 365 for Customer Engagement (CE) appeared first on Microsoft Dynamics 365 | PowerObjects. Источник: https://www.powerobjects.com/2019/01...-bi-url-query/
__________________
Расскажите о новых и интересных блогах по Microsoft Dynamics, напишите личное сообщение администратору. |
|
|
|
|
|