|
|
|
|
#1 |
|
Участник
|
powerobjects: Configuring the Dynamics 365 App for Outlook
Источник: https://www.powerobjects.com/2017/11...p-for-outlook/
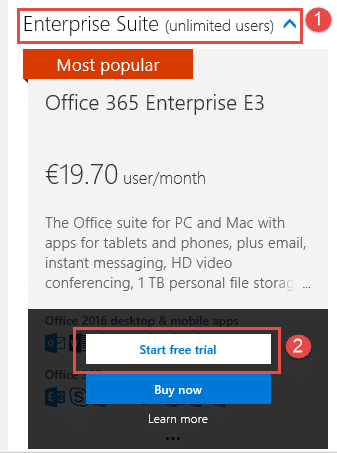
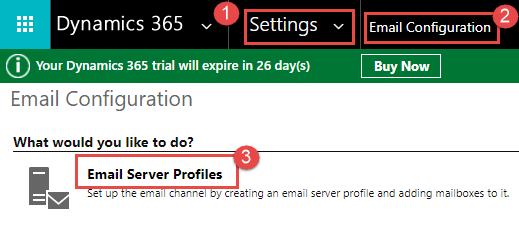
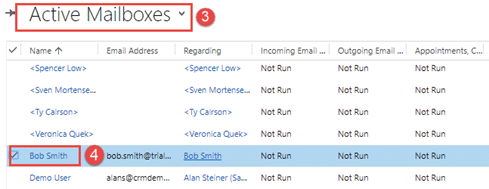
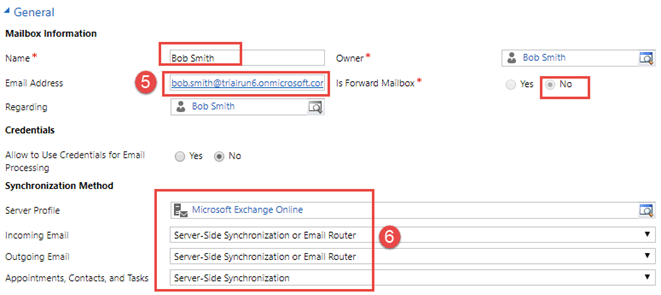
==============  Today we are going to cover an awesome Dynamics 365 feature, and that’s the Dynamics 365 App for Outlook! The Dynamics 365 App for Outlook is a great tool that enables end users to access Dynamics 365 records directly within the Outlook client. End users are also able to track sent/received emails back to Dynamics 365 alongside “track regarding” which tracks an email connected to the contact, case, account, and other records. The aforementioned feature can be found in another blog by PowerObjects which looks at five things we love about this app, along with other super cool functionalities! In this blog, we will look at how to set up and configure the Dynamics 365 App for Outlook as this is the prerequisite to use the app successfully. The environment on which we will focus in this blog will be for Dynamics 365 Online. On-premises is also supported and requires knowledge of your Exchange server information. It is extremely important for organizations to have a subscription that connects to the Microsoft Exchange server. This will enable the end user to send/receive mail within Dynamics 365 and allow the user to download the app. Let’s begin! Step 1: check if your organization has a subscription to enable Microsoft Exchange. Note: this action will have to be performed as a System Administrator. Go into the Office 365 Admin Center, then under the navigation menu, expand the billing tab then click subscription.  Step 2 Click “add subscriptions” while in the subscription window and then under the “Enterprise Suite” select the Office 365 Enterprise E3 trial or any trial (which will suit the requirements of your business) that enables Microsoft Exchange. While hovering over the tile, an option to buy or start a free trial will be presented. Click “start free trial.” This will take you to the checkout page and prompt you to confirm your order. Click “try now” and then follow the steps to complete the download. Note: the system will take a while to process the download and set up all the apps.  Step 3: Set up the email server profile. Navigate to Email Configuration under the settings module, and then go into email server profiles. Ensure Microsoft Exchange is listed under the “Active Email Server Profiles”.   Step 4: Test and enable the mailboxes for each end user Going back into email configuration, drill into “mailboxes.” Under “Active Mailboxes” drill into a mailbox which has not been tested and enabled. Ensure the user’s name is correct along with the email address (this will link to the Microsoft Exchange server) and be sure to mark no for “forward mailbox.” Underneath Synchronization Method, ensure four things; server profile is “Microsoft Exchange Online,” Incoming and Outgoing Email is “Server Side Synchronisation or Email Router,” and Appointments, Contacts, and Tasks are set to either “Server Side Sync” or “Microsoft Dynamics 365 for Outlook.” Note: if a mailbox has not been tested it’s incoming/outgoing/appointments statuses will be listed as “not run.”    Step 5: Approve email and start testing the mailbox Staying in the Mailbox configuration window, click the option to approve email. This will make the email the default email for the user within the system. Then click “test and enable mailbox” to run the test.  After a few moments, refresh the window to see the statuses for incoming, outgoing, and appointments change to “success” beneath the “configuration test results” tab. Once you see this, your users are ready to download the Dynamics 365 App for Outlook. Tip: you can see the status of the user’s mailbox from the “active mailboxes” view (shown in step 4).  Step 6: Download the Dynamics 365 App for Outlook through the Dynamics 365 environment Click the “settings” command within the navigation bar, and select the “Apps for Dynamics 365” option. Then select “Microsoft Dynamics 365 App for Outlook” (caution: NOT Microsoft Dynamics 365 for Outlook) and the system will download it as a background process which will shortly be visible in Outlook.   Step 7: Ensure the Dynamics 365 App for Outlook is available via the Outlook desktop client Once the app has been successfully installed, it will be visible in the command ribbon within Outlook.  So there you have it! Know you know how to successfully and easily install the Dynamics 365 App for Outlook for your organization. Keep checking our blog for more helpful how-to guides. Happy Dynamics 365’ing! Источник: https://www.powerobjects.com/2017/11...p-for-outlook/
__________________
Расскажите о новых и интересных блогах по Microsoft Dynamics, напишите личное сообщение администратору. |
|
|
|
|
|